Create a Moments™ Notification
This guide walks you through creating a Moments™ notification. When specific conditions are met (such as certain phrases being spoken, time elapsed, or behavioral metrics), agents receive targeted notifications to help guide their conversations.
A notification consists of four main components that you’ll configure:
Access the Moments™ Console
Before creating a notification, ensure you can access the Moments™ Console:
- Navigate to the Revenue App in your browser
- Log in with your Salesforce credentials
- Hover over Coaching and click Moments
Create a New Notification
Click the + Create Notification button located at the top-right of the page.
The notification creation wizard will open, guiding you through four steps: Who, When, What, and Moment.
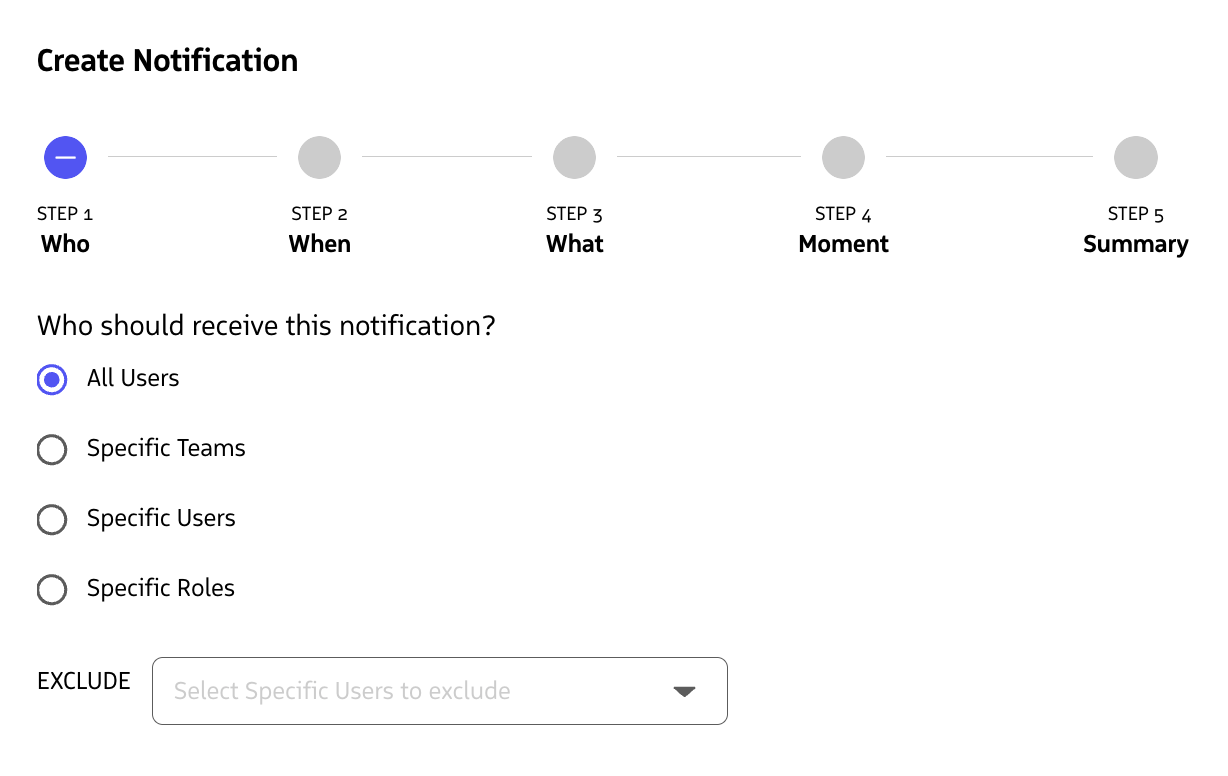
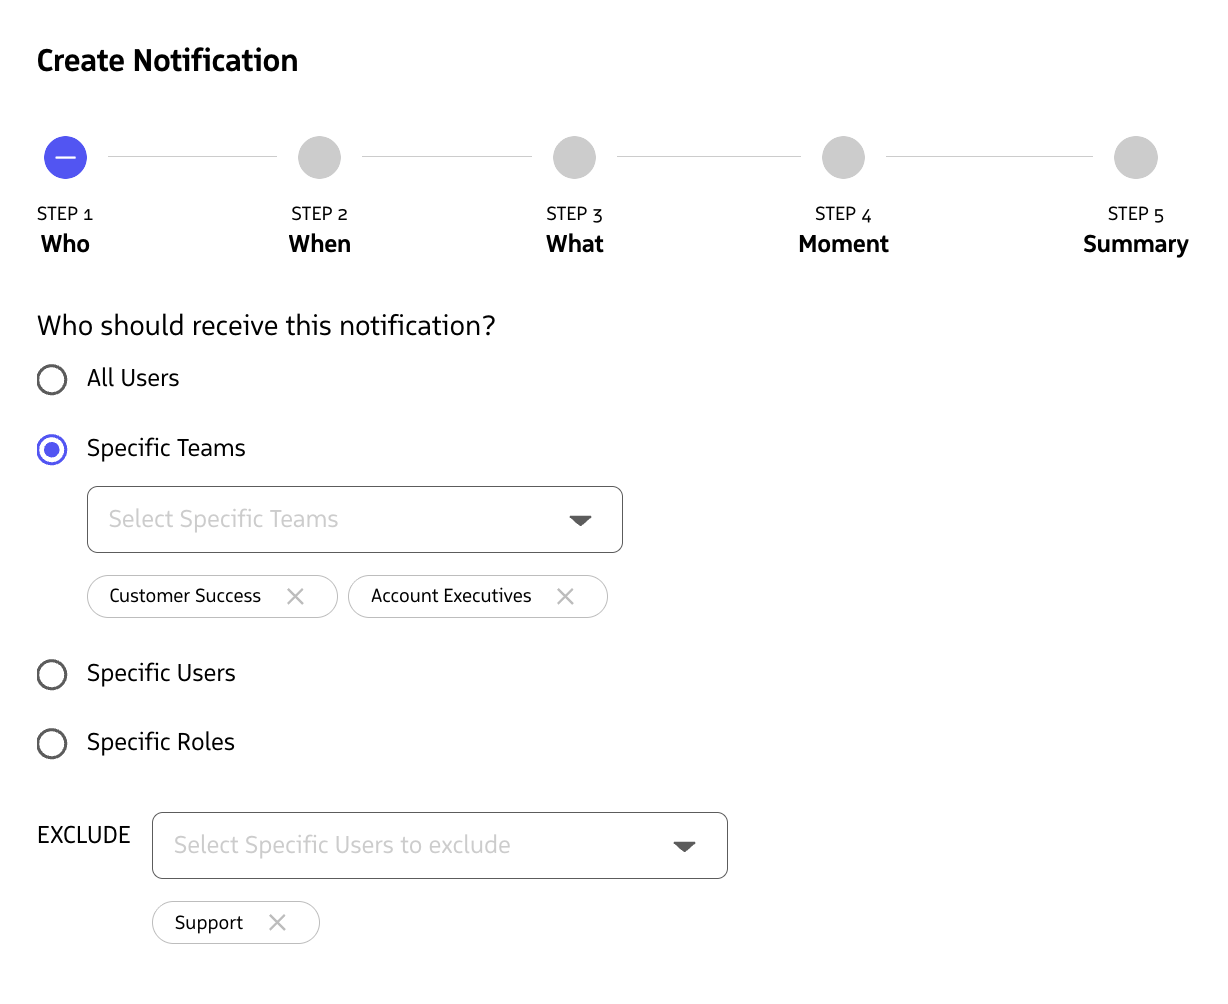
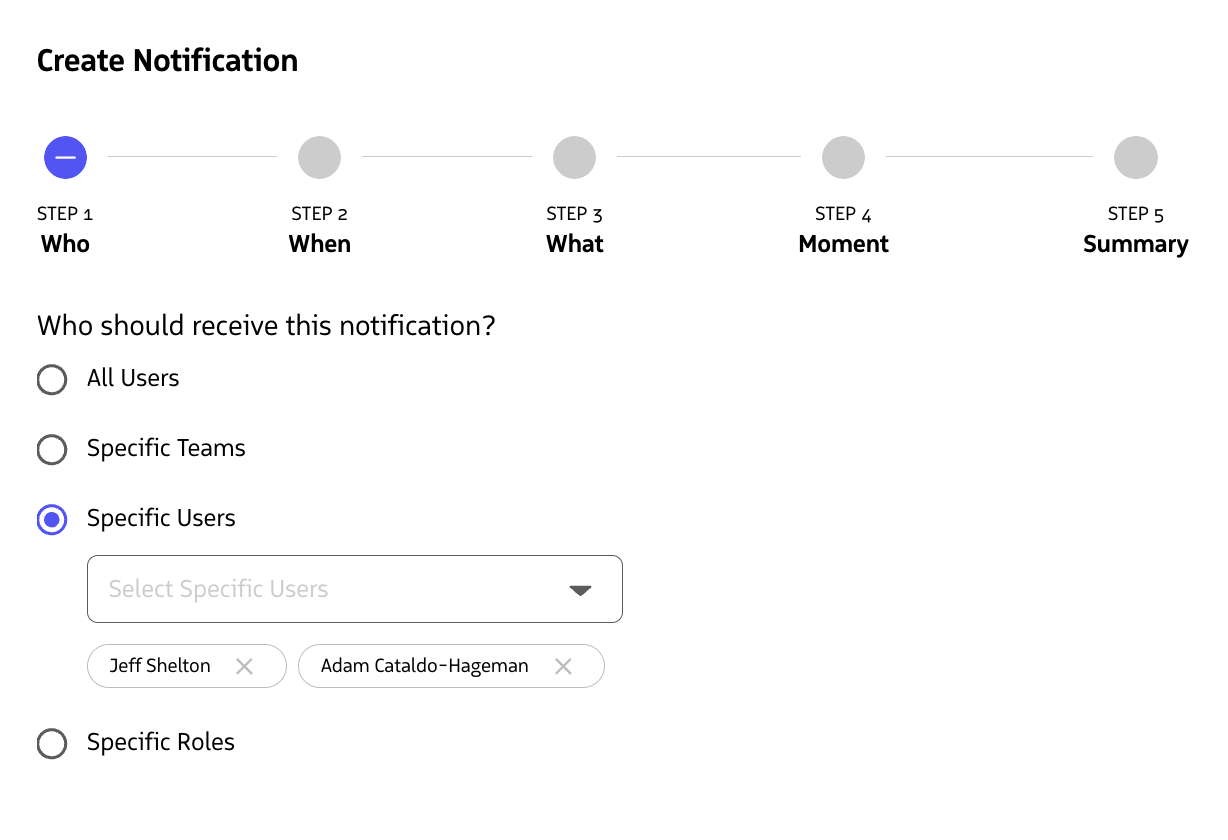
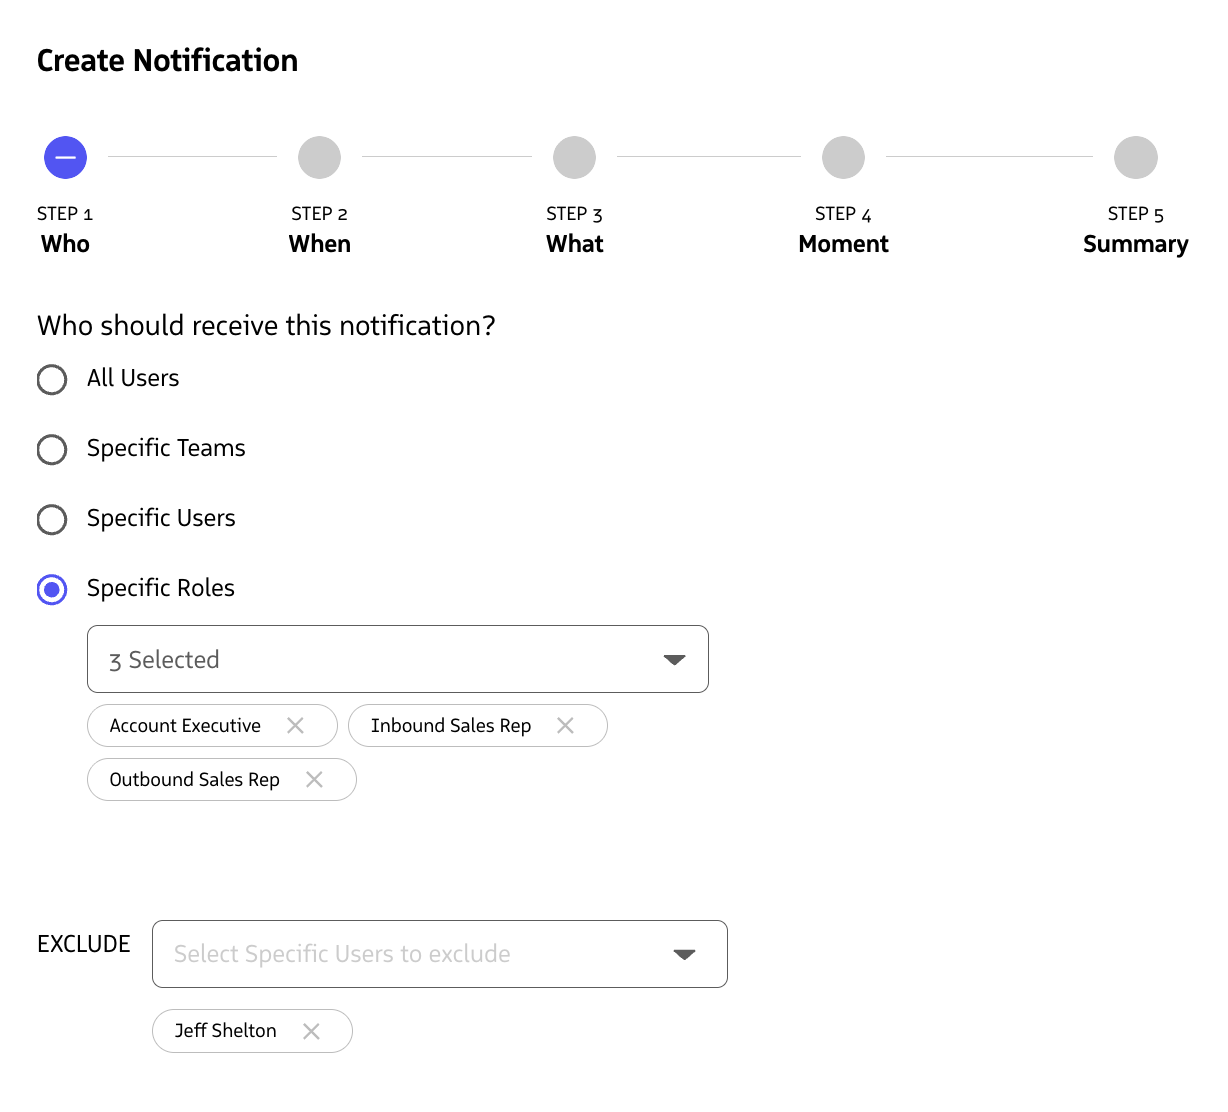
Configure Who Receives the Notification
The Who step defines your target audience. This determines which users will receive the notification when it triggers.
Explore the tabs below to learn more about the different options.
If you have administrator permissions, you can target all users in your organization:
- Select All Users (this is the default option for administrators)
- The notification will trigger for everyone based on the conditions you set in the “When” step
Once you’ve selected your target audience, click Next to proceed to the When step.
Configure When the Notification is Applied
The When step defines the types of conversations this Notification is applied to.
By default, a notification will be associated with “All Conversations.”
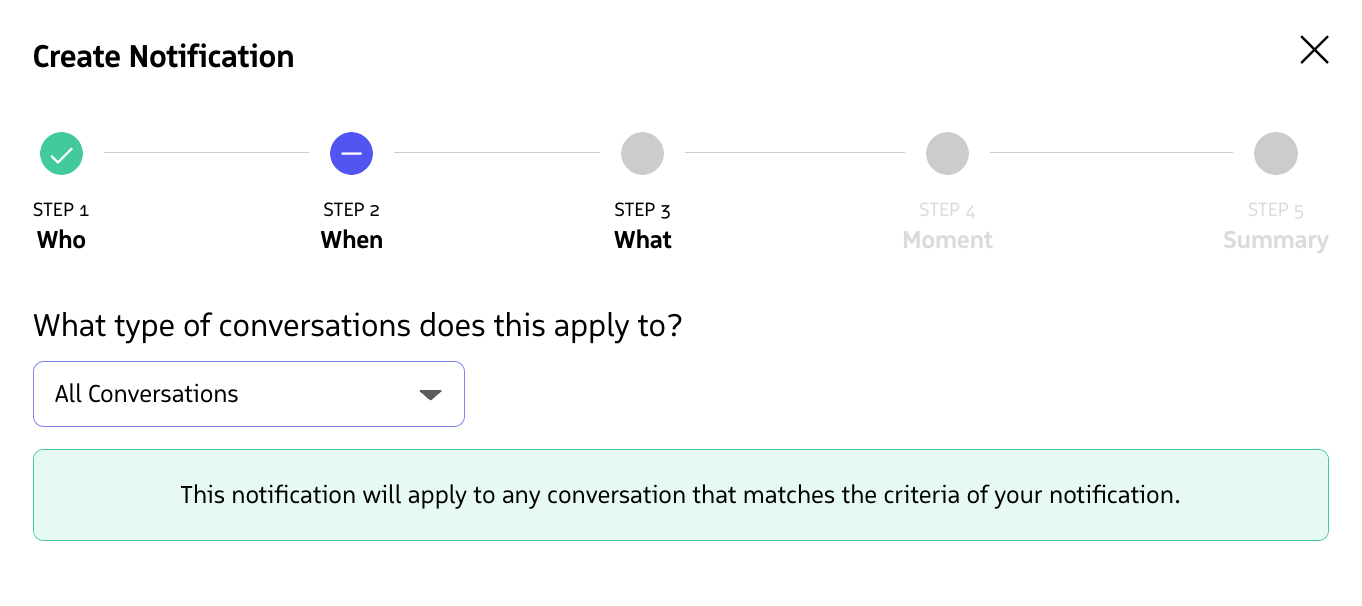
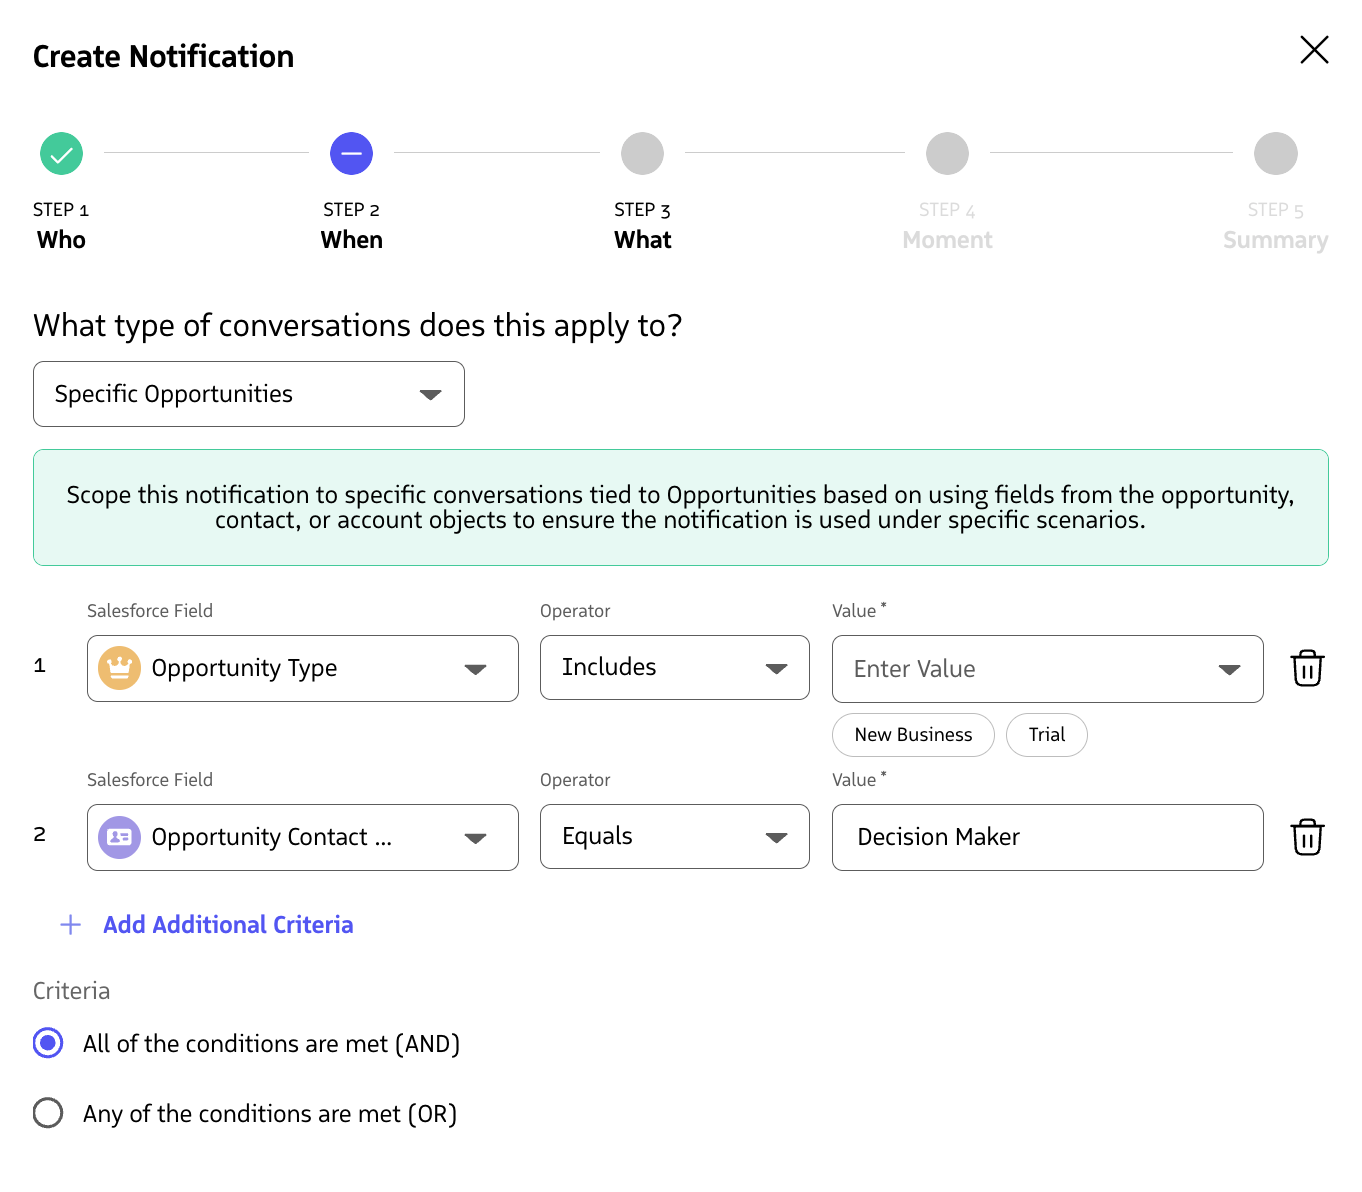
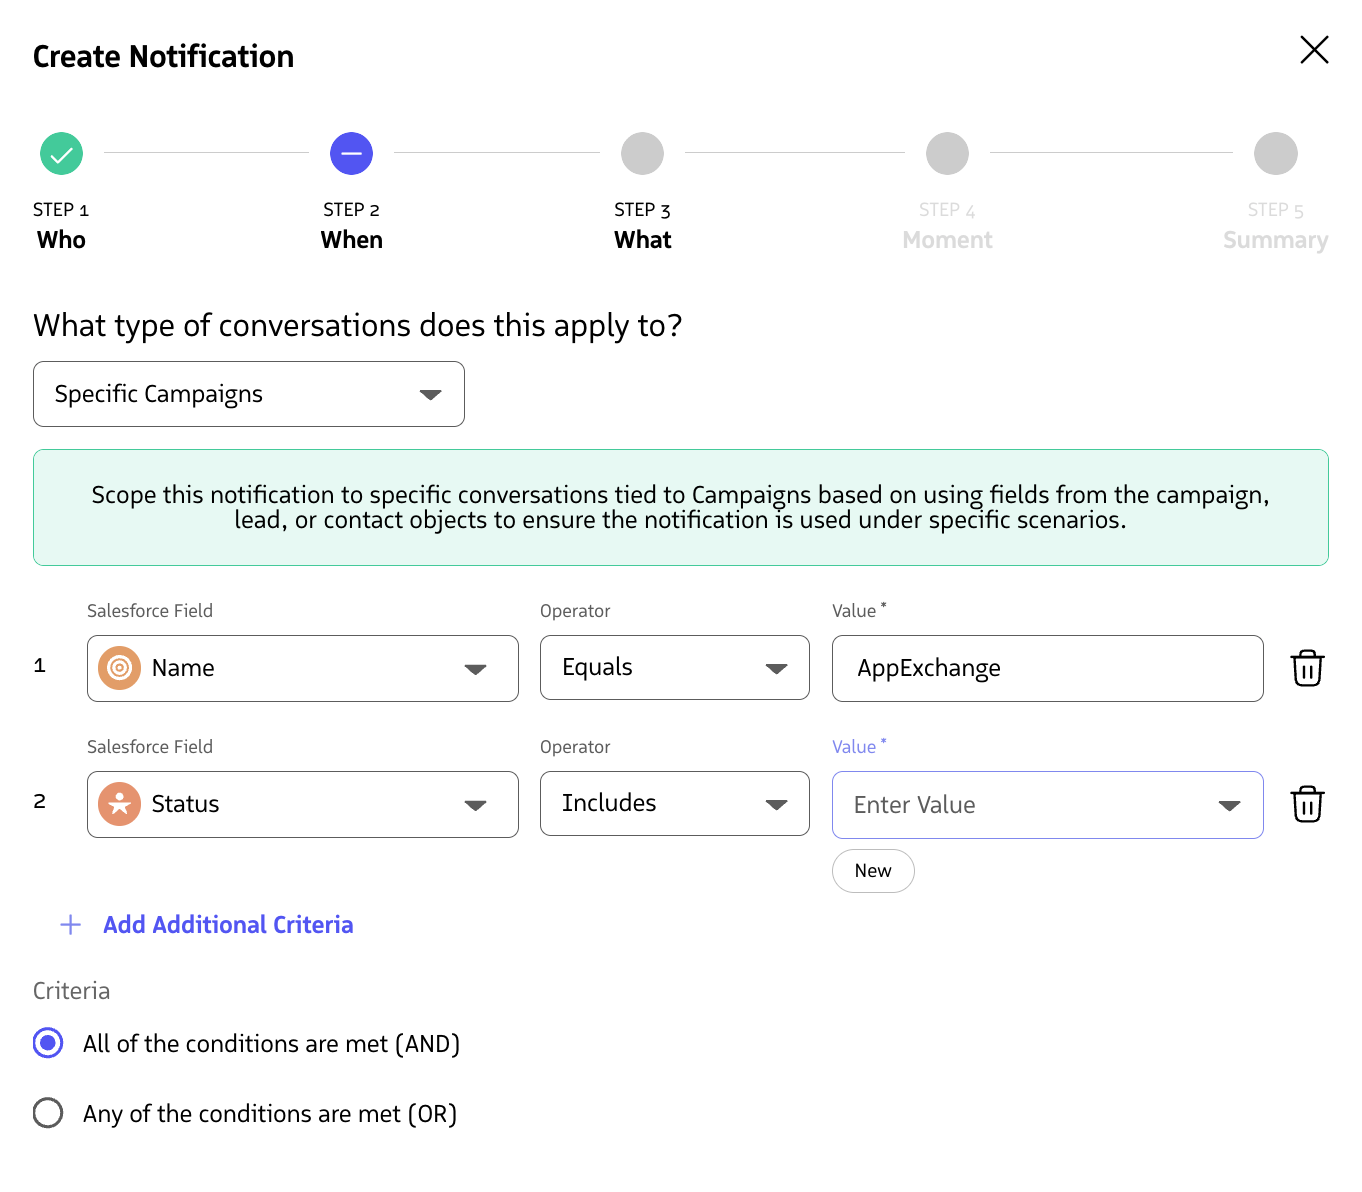
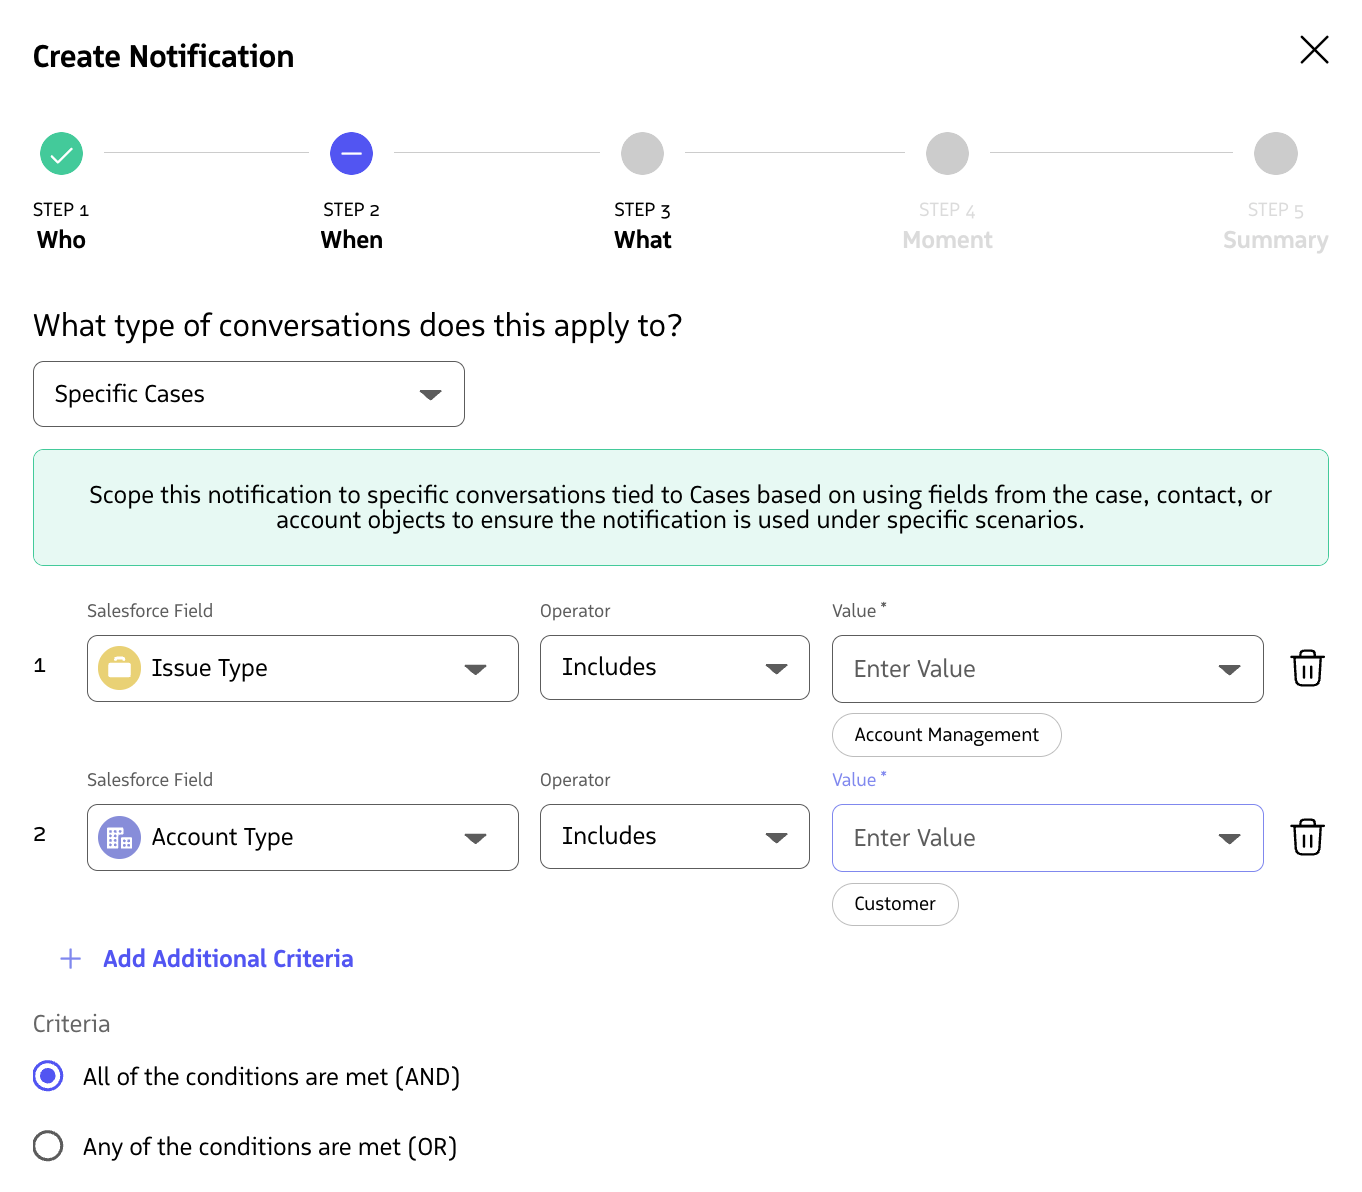
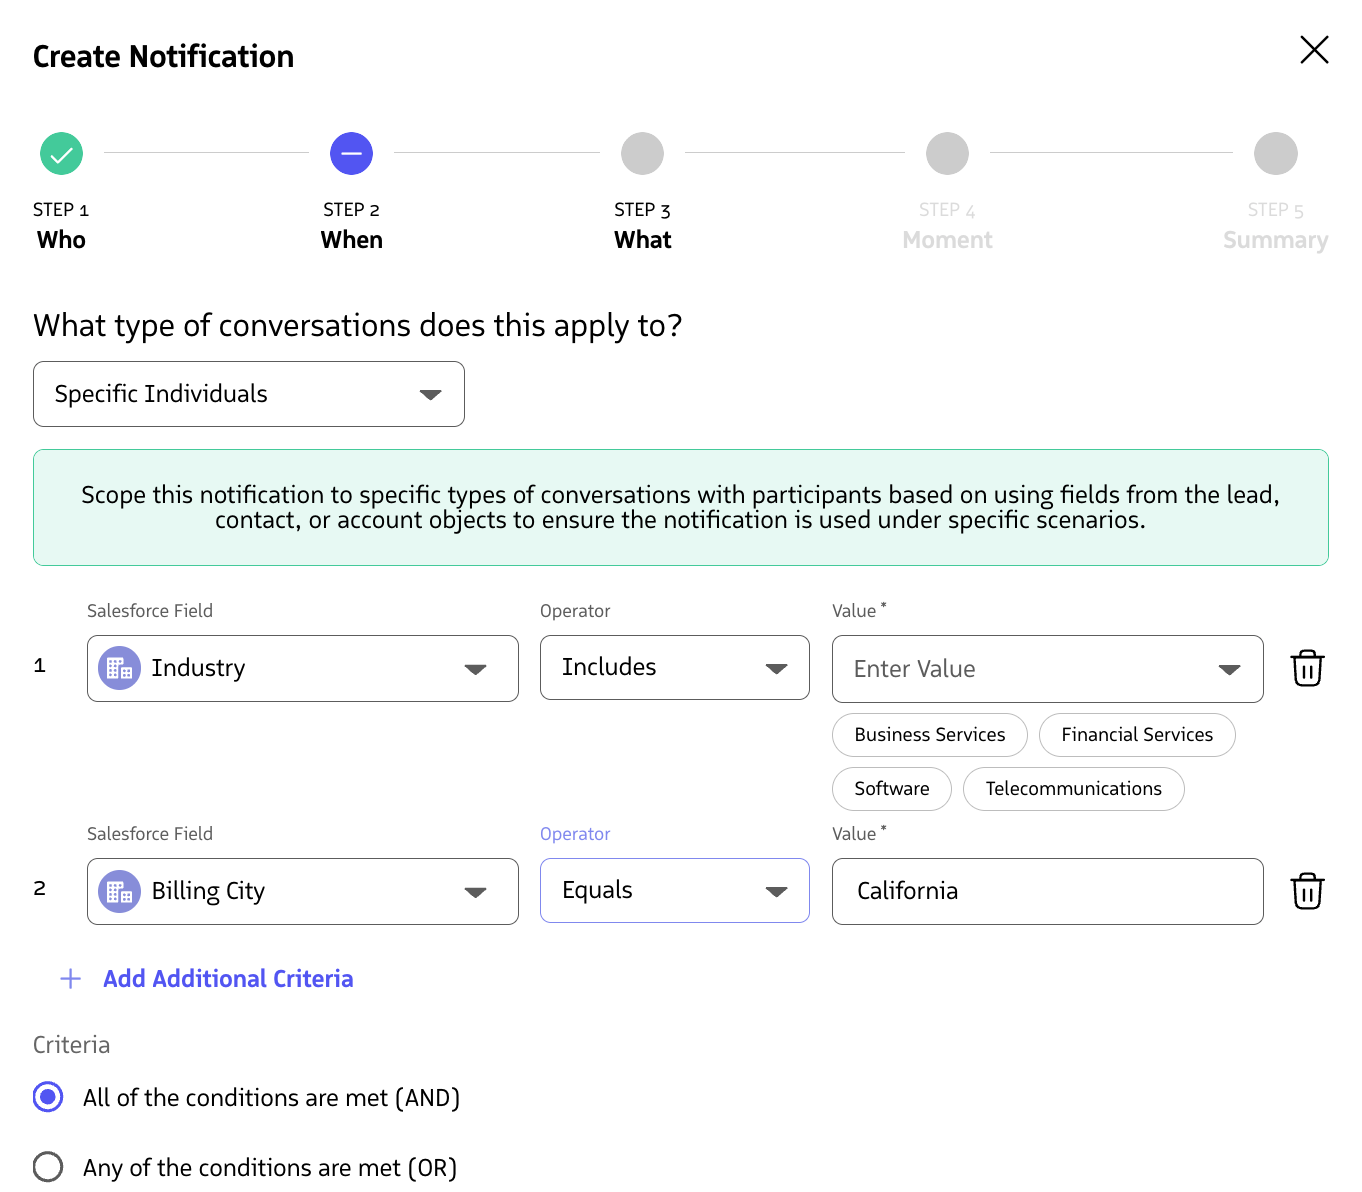
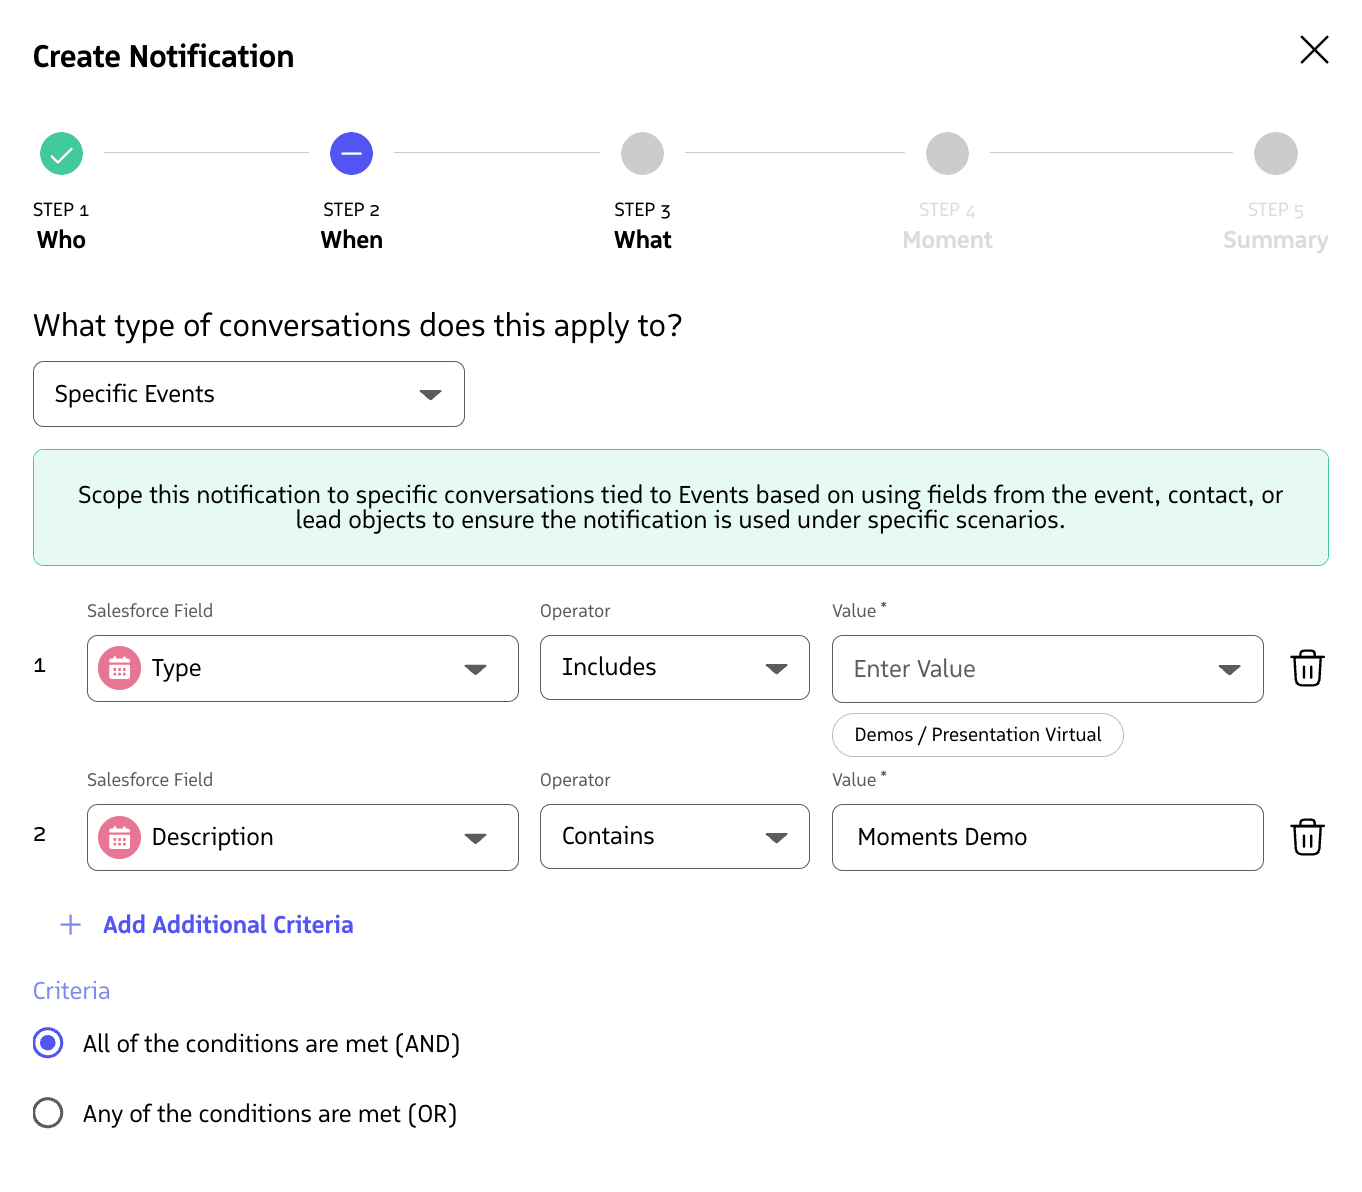
Upon selection of one of the available options (with exception of “all conversations”), you will be presented with a list of fields to be evaluated to make sure that the notification is relevant to the conversation.
You can add more than one criteria to a notification by clicking + Add Additional Criteria.
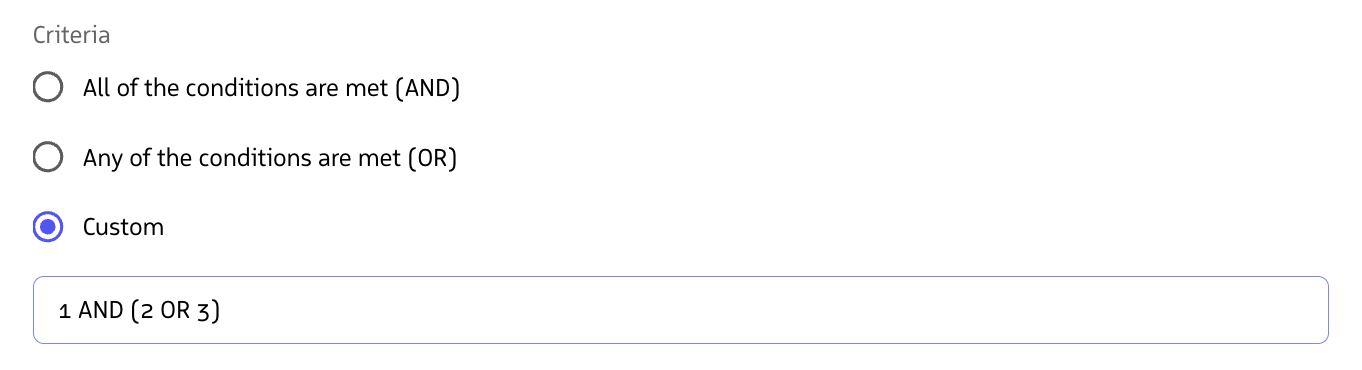
If there are more than two fields that are added to a Notification, you can select from an All of the conditions are met (AND) or Any of the conditions are met (OR) options. With three or more fields added, you can select a Custom option to designate criteria logic to evaluate a combination of criteria.
Once you’ve selected what conversations the Notification should be applied to, click Next to proceed to the What step.
Configure What Triggers the Notification Triggers
The what step defines the type of Notification that the user is trying to generate. They fall within one of four categories of notifications:
Checklists
Checklists are step-by-step guides that agents can complete during conversations. They can include up to 15 individual checklist items and are triggered based on what is said in a conversation or at a specific point in time.
Best For:
- Ensuring agents follow a specific process or sequence
- Guiding agents through complex sales or support procedures
- Providing structured guidance for common scenarios
Example: A checklist for handling customer objections with steps like "Acknowledge the concern," "Ask clarifying questions," and "Present a solution."
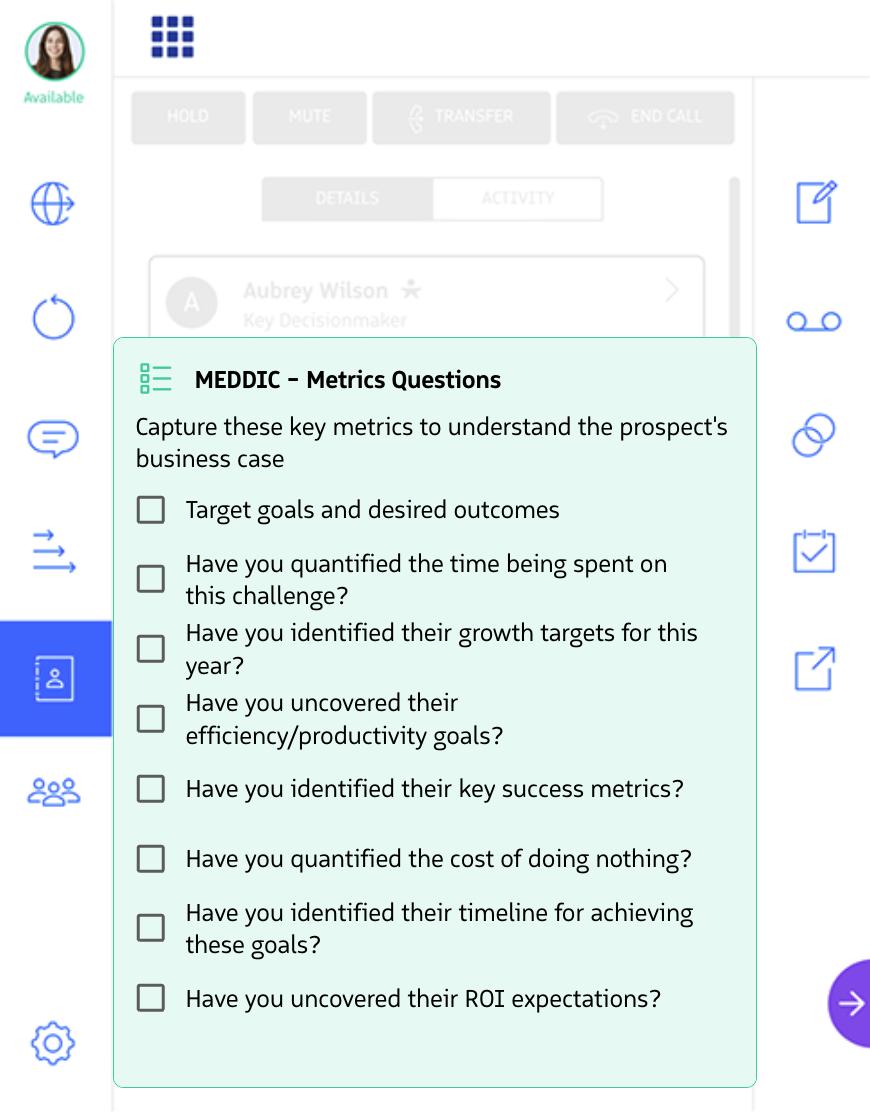
Checklists provide step-by-step guidance
Guidance
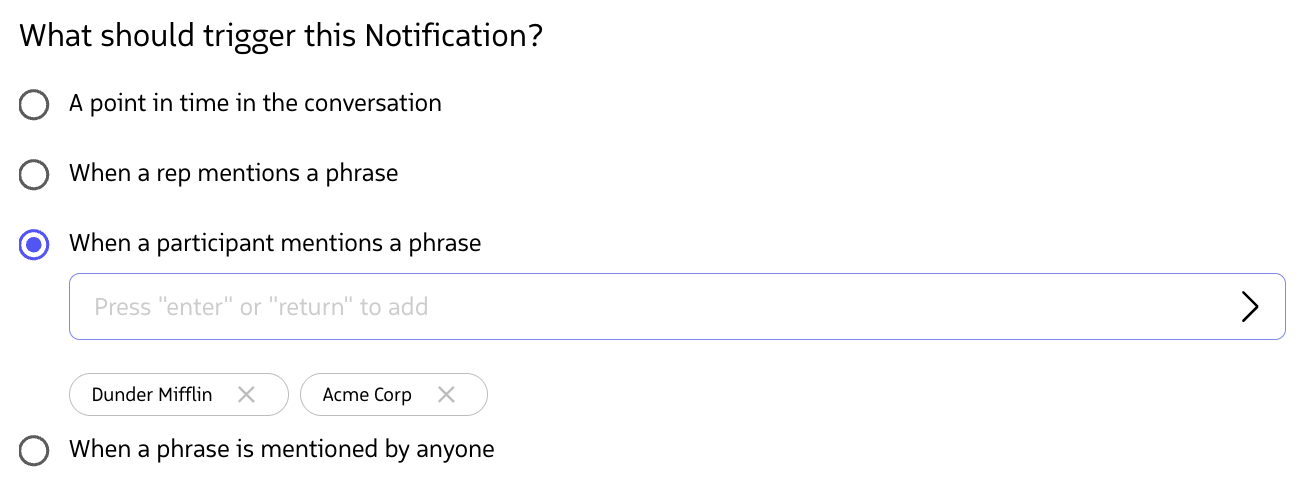
Guidance notifications provide contextual help to agents based on what is mentioned during a conversation. They can be triggered when specific phrases are detected from the rep, participant, or anyone in the conversation.
Best For:
- Providing competitor intelligence when competitors are mentioned
- Offering talking points when specific topics arise
- Delivering contextual information based on conversation content
Example: When a customer mentions a competitor, show guidance with talking points about your product's advantages.
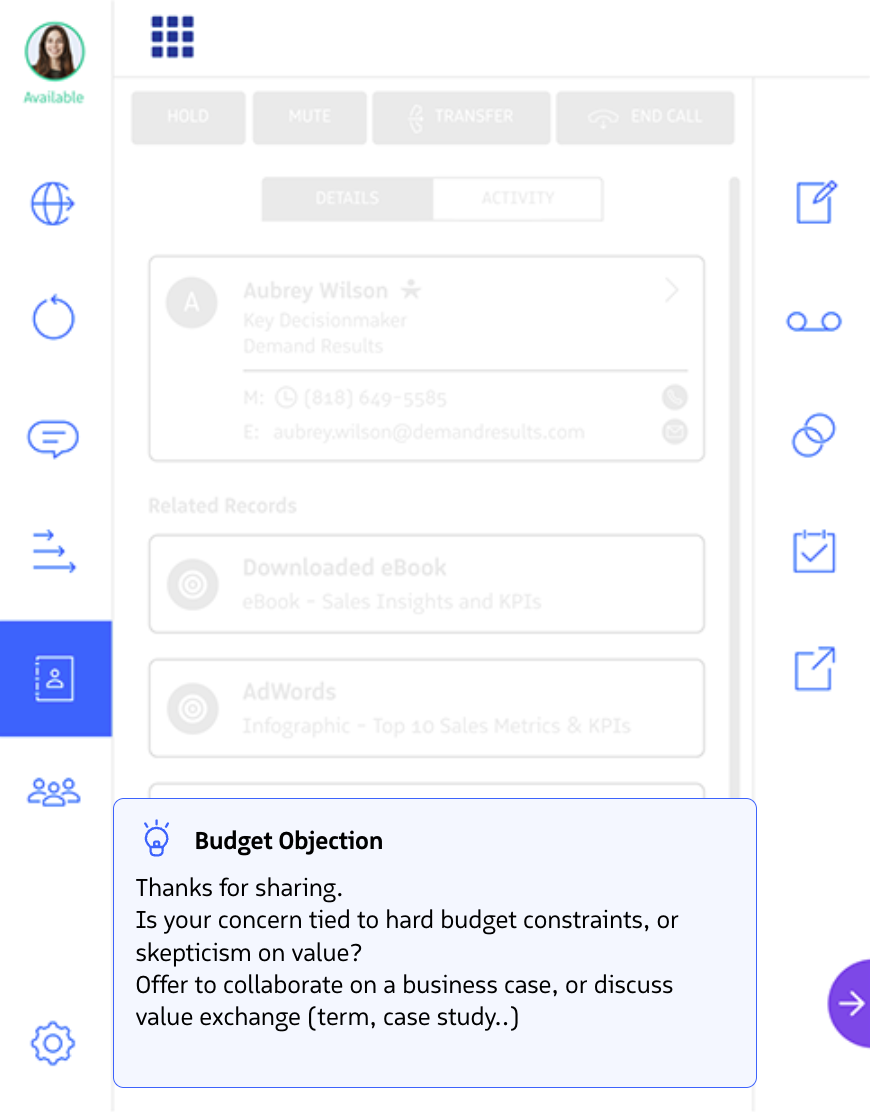
Guidance notifications provide contextual help
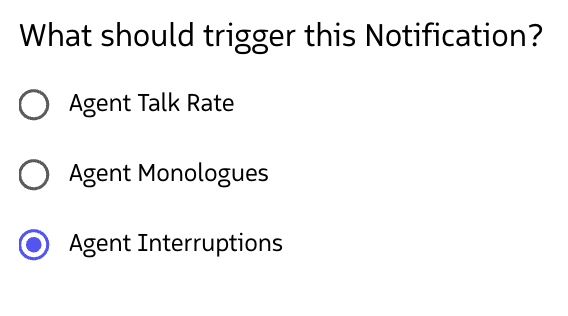
Behavior Alerts
Behavior alerts are triggered based on conversation behavior patterns, including:
- Talk Rate - When reps are speaking too fast
- Monologues - When reps speak for long uninterrupted stretches
- Interruptions - When reps speak while another participant was previously speaking
Best For:
- Coaching agents on conversation dynamics
- Improving listening skills
- Ensuring balanced conversations
Example: Alert an agents if they have interrupted the other participant, encouraging them to engage them in the conversation.
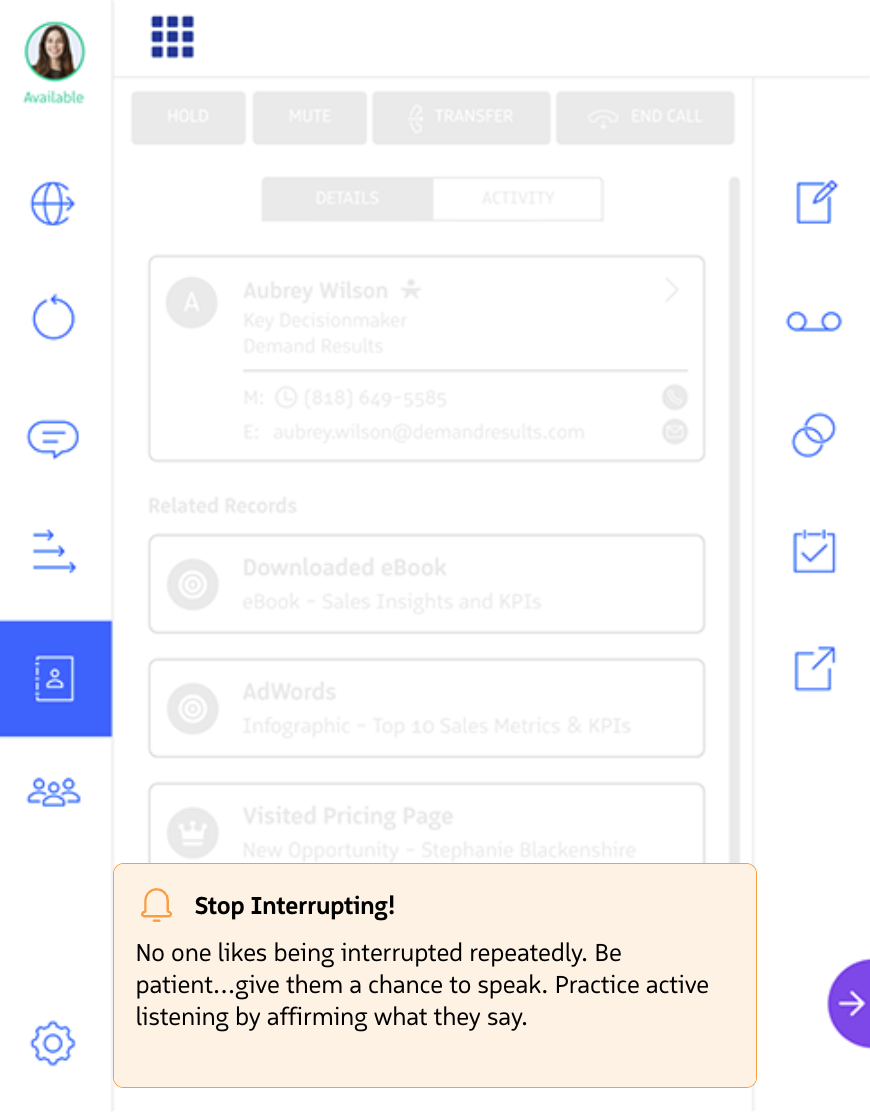
Behavior alerts monitor conversation patterns
Compliance Reminders
Compliance reminders are based on what is not said by a specific point in a conversation. These notifications help ensure agents follow required procedures and ask necessary questions.
Best For:
- Ensuring agents ask for call recording consent
- Reminding agents to ask required qualification questions
- Verifying compliance with regulatory requirements
Example: Remind agents to ask for recording consent if they haven't done so within the first 30 seconds of a call.
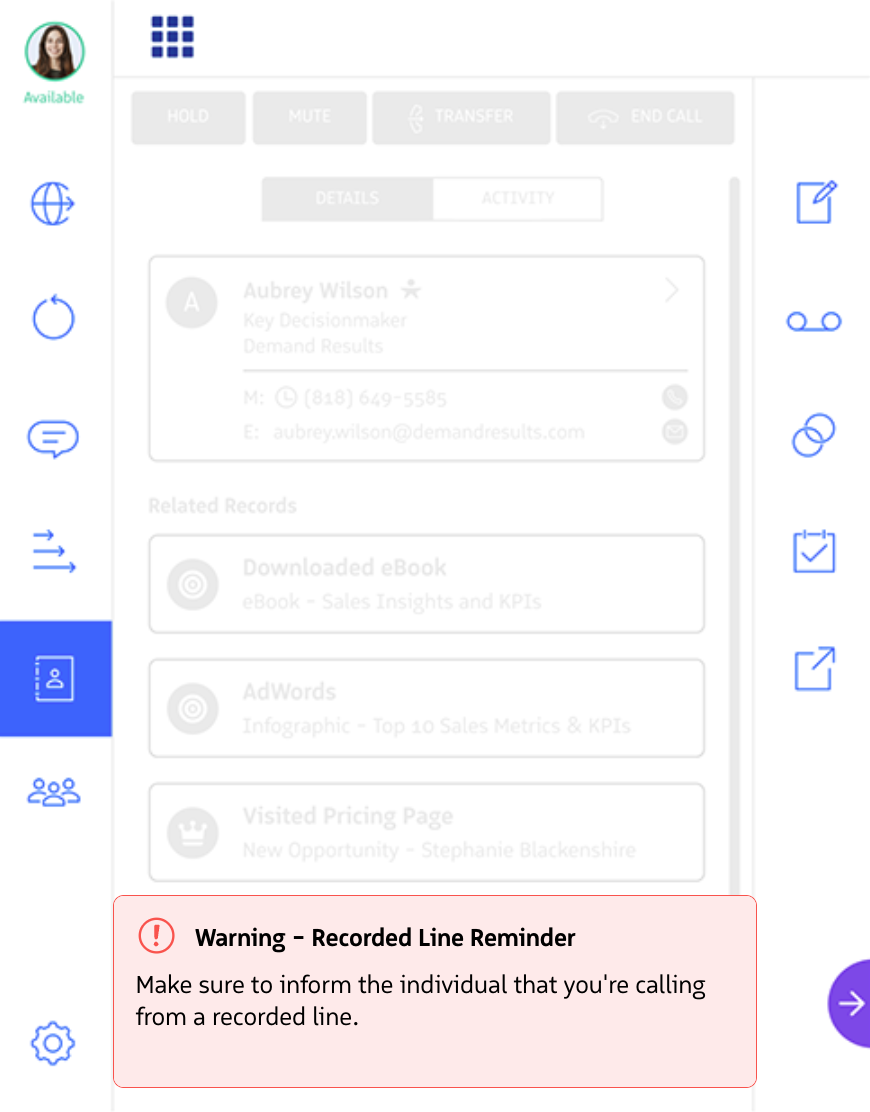
Compliance reminders ensure required actions are taken
Once you have selected what type of Notification to display, you can configure the triggering criteria based on the following options.
Trigger notifications based on elapsed time during a conversation:
- Select Time-Based trigger type
- Set the time threshold (e.g., 60 seconds, 2 minutes)
Example Use Case: Remind agents to ask a qualification question if they haven’t done so within the first minute of a call.
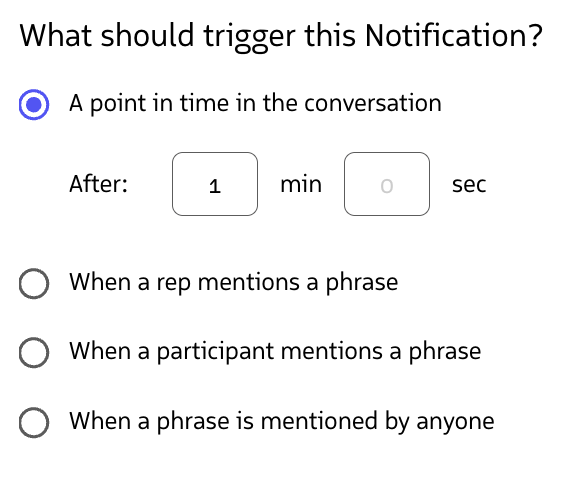
Configure time-based triggers
Once you’ve selected your notification type and configured the triggering criteria, click Next to proceed to the Content step.
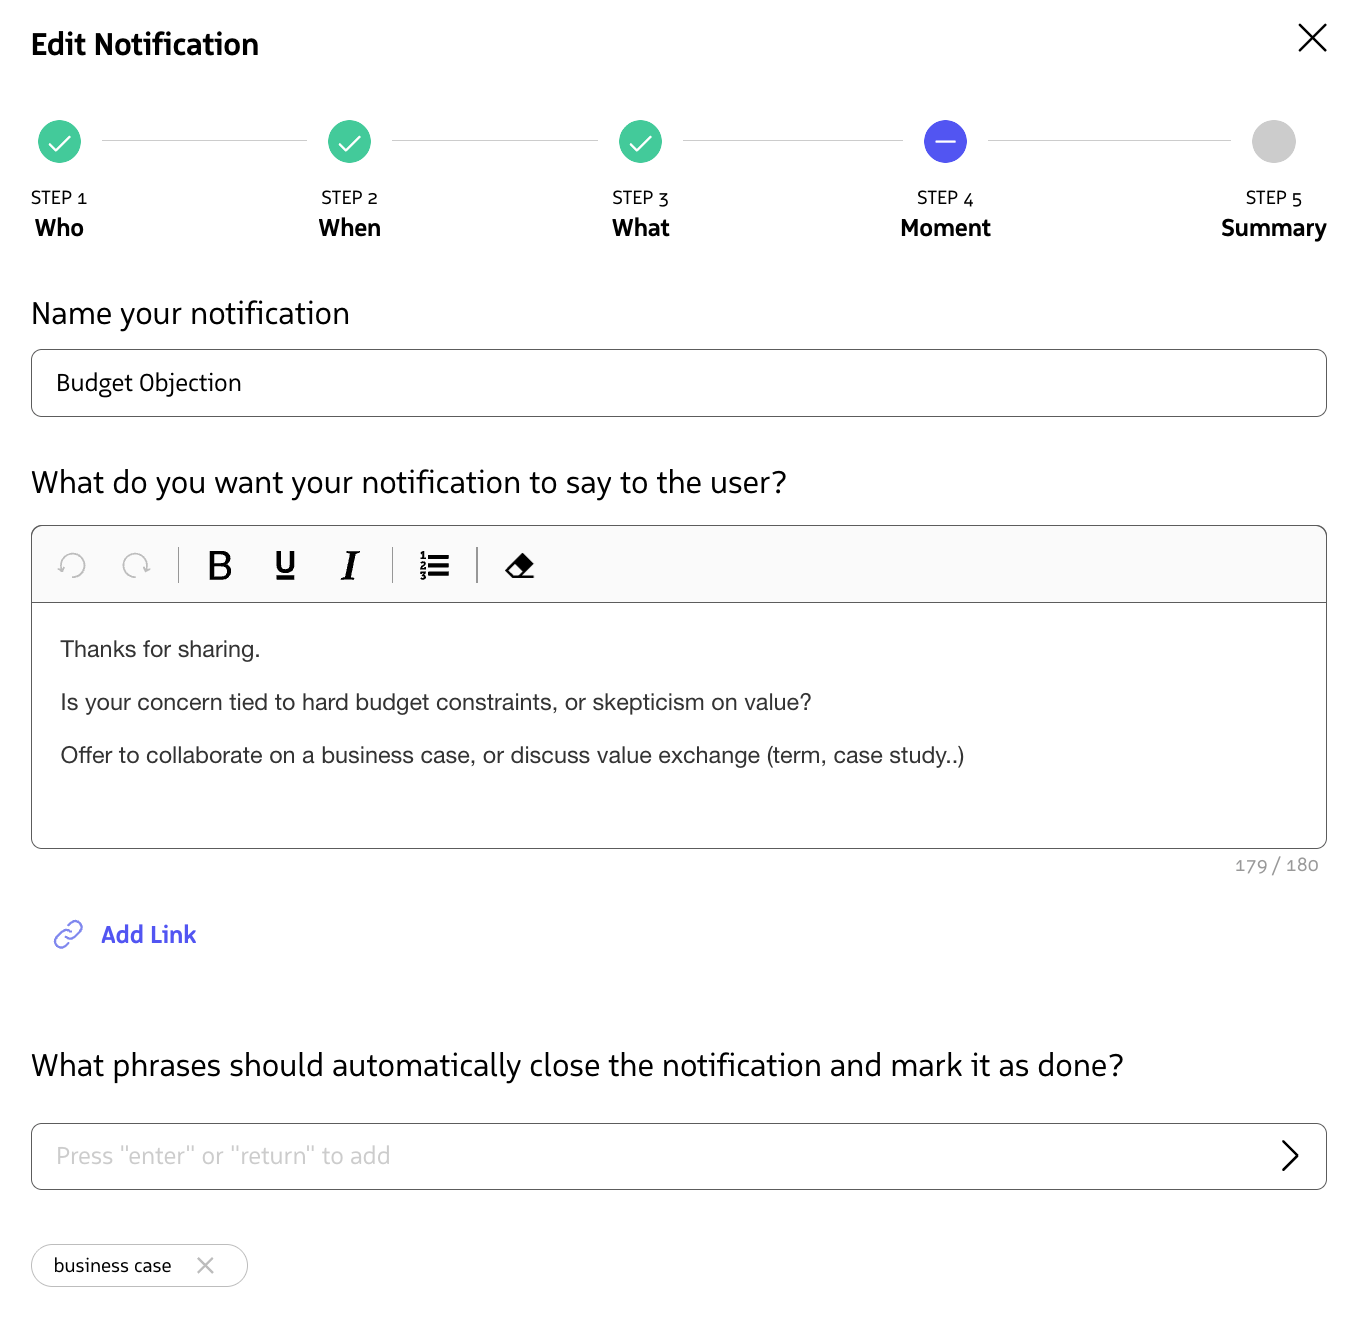
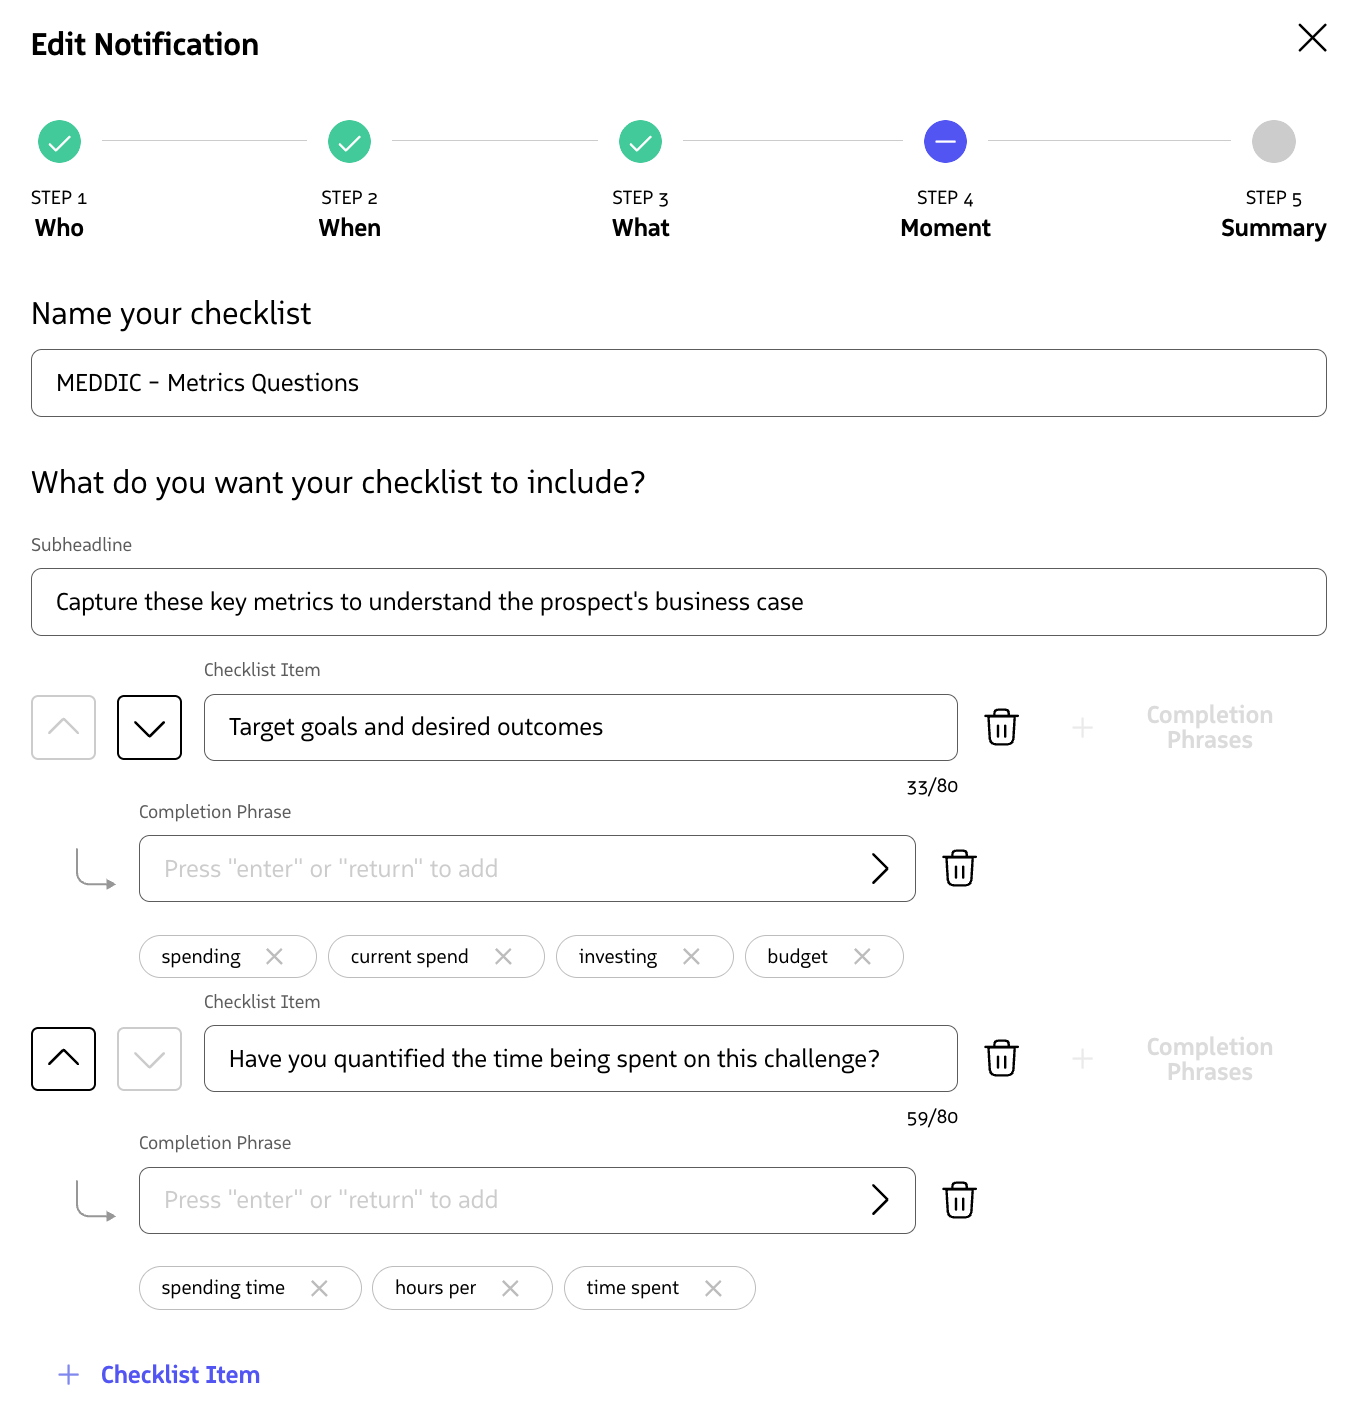
Add Content to Your Notification
The Content step is where you define what agents will see when the notification triggers. If you started with a template, you can modify the content that came with it, or create new content.
- Click Create Content or Add Content
- Fill in the content details:
For Notifications
- Notification Name (Required) - This is the name of your Notification. It also displayed to users as the headline of your Notification
- Content Body (Required) - The message text (up to 180 characters)
- Link URL (Optional) - Add a clickable link to an external resource
- Link Display Text (Optional) - Display Text for the link
- Completion Phrases (Optional) - Phrases that automatically mark the notification as complete
For Checklists
- Notification Name (Required) - The checklist headline
- Subheadline (Optional) - Additional context for the checklist
- Checklist Items (Required) - Add up to 15 items for agents to complete
- Completion Phrases (Optional) - Phrases that mark individual items as complete
Note: A notification must have content associated with it before it can be enabled.
After adding your content, click Next to proceed to the review step.
Review and Save
Review your notification configuration and check that all steps are complete.
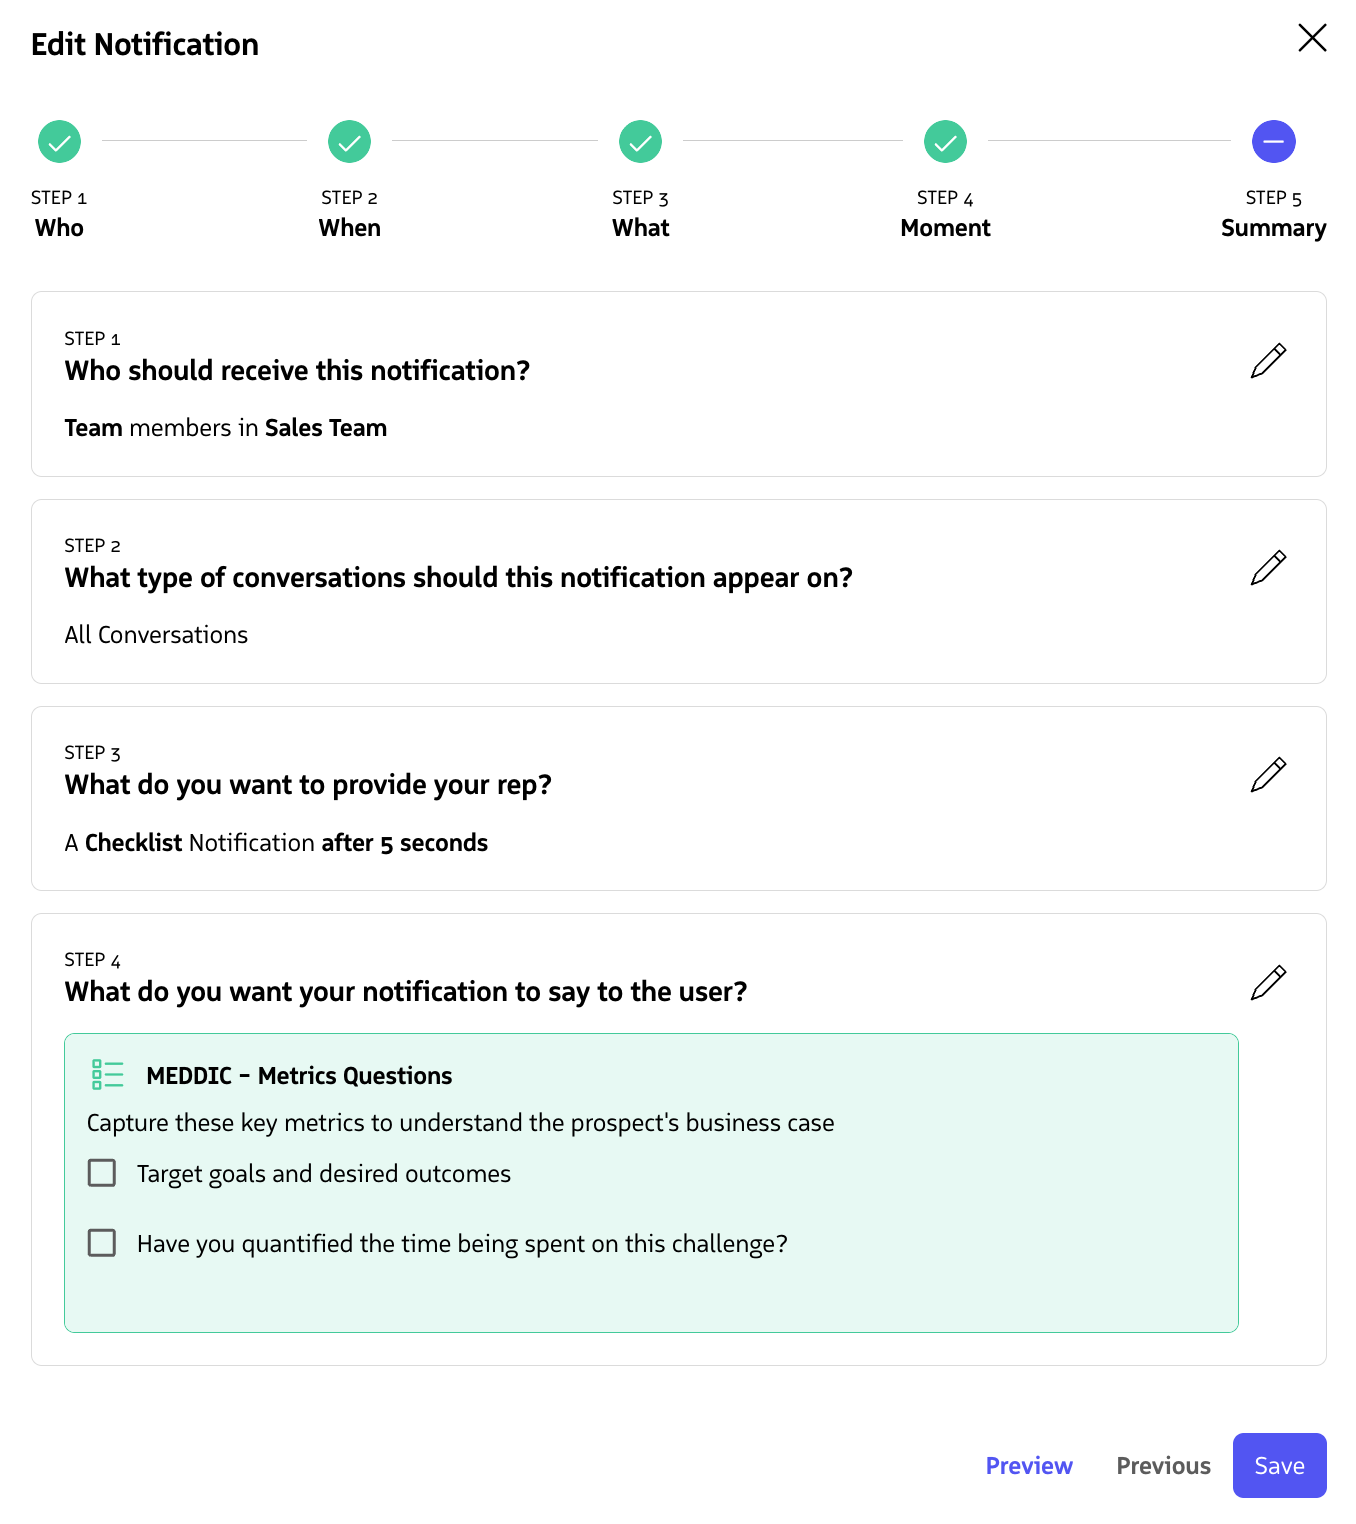
Review your configuration before saving
Click Save to create your notification
Enable Your Notification
After saving, you will be brought to the All Moments™ page.
Your notification is created but not yet active. To enable it:
- Find your notification in the list
- Toggle the switch under the Status column to activate it

Enable your notification